In this article, I have explained how to take screenshots on Windows 10 laptop. Screenshots of Windows 10 on any laptop or PC are done by simply holding down the combination of two buttons which I have explained in the article below. With the help of the Free Snipping Tool, you can take a screenshot or snip off a specific area of your laptop or computer display.
Contents
How to Take Screenshots in Windows 10 For Laptop
So to take a screenshot, you have to press the combination of two keyboard buttons with your laptop. So before I open my site, it’s my tech website, so we take a screenshot of it.

How to Take Screenshot on Windows Computer
How to Use Windows Key + Print Screen For Laptop
If you want to take a screenshot, then you will have the Windows key with the button on the keyboard of the laptop, which will have the Windows key symbol on it, as well as the print screen will be written on a button, press this button simultaneously.

Where to find screenshots taken on Windows 10
When you press this combination, the guided nature of the screen will be virtualized and the screenshot will be ready. To see the screenshot you have taken, you have to open your PC, then there will be a folder of pictures, you have to go to that folder and you will find the screenshots you have taken here.
How to Take Screenshots in Windows 10 For Computer
Till now you were learning to take screenshots on a laptop but now you will learn to take screenshots on a computer. To take a screenshot on the computer you will see the Print Screen button next to the Windows button as well as the numeric button on the external keyboard, press the combination of those two buttons.

After that, you will see that the computer screen will be virtualized and the screenshot will be ready. If you want to see the screenshot taken, you have to go to your PC and go to the folder containing the picture and it will be found there.
How to Screenshots without PrintScreen Button (Using Snipping Tool)
So far we have learned how to take a screenshot of the entire screen of a laptop and computer, but if you want to take a screenshot of a particular area of the screen, then how to take it. Let us tell you that any Windows laptop or computer has a built-in tool, which is named Snipping Tool.
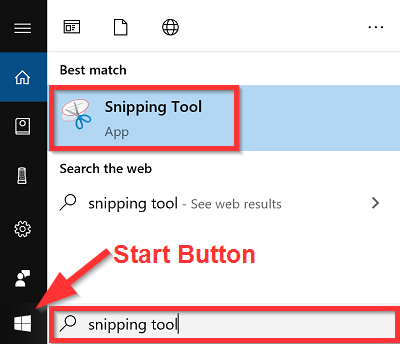
Snipping Tool is absolutely free and it is inbuilt with Windows operating system. This tool is installed only during Windows installation. How to take a screenshot of your specific area with the Snipping Tool? First of all, you will see this search item in the search box near the start button, you open it and type snipping, you will get this tool.
How to Use Snipping Tool to Capture a Screenshot
When you open that tool, you will see two options of New and Mode. When you select the mood option, you will get four options.
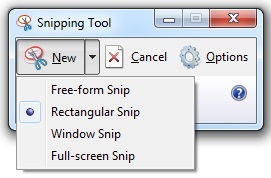
Freeform snip first means you can take any size screenshot.
The second rectangular snip means you can take a screenshot of any specific area of the rectangular shape.
Third Windows Snip This means that you can take a screenshot of a single Windows.
The fourth full-screen snip means you can take full-screen shorts.
I will keep writing more posts related to this, so do not forget to bookmark (Ctrl + D) our blog “EduTechGyan.COM” on your mobile or computer and subscribe us now to get all the posts in your email.
If you like this post, then do not forget to share it with your friends. You can help us reach more people by sharing it on social networking sites like Facebook or Twitter. Thank you !
Must Read:-